
I edited this on 7/15/2018 after a few questions…
As the Arctic blast hits New England, I realized that we did not have enough warm head wear for the crazy cold weather. So, I found a wonderful tutorial on Olive Leaf Journal (https://oliveleafjournal.com/2014/01/13/fleece-hood-and-balaclava/). This is everything…a hood, a face shield and a scarf…with no long scarf tails to get tangled and lost and caught in everything. The piece she calls scarf is the portion that will cover the face/nose.
I made the first hood to the measurements in the tutorial and it fits my 7-year old son very well. My head is 23 1/2 inches. So, I had to up-size the hood to fit me. So, I cut the pieces for my 23 1/2 inch head as:
- HOOD: 17″ h, 16″ wide
- SCARF/FACE COVER: 11″h, 16″ wide (single layer, hem 11″ side).
- NECK COVER: 11″h, 16″. Hem 16″ side that you cut into a curve.
The tutorial is generously shared by the author and its her creative work. I’ve made a few edits to ease of creation to work for me. Once you make it, is pretty easy to follow. However, I thought it might be helpful to add a few extra details for the first-time sewer.
- Hem the piece labelled “Neck Cover” along the curved bottom. You only need a 1/2″ hem.
- Hem the hood with at least a 1″ hem. This will also provide a casing for a string to tighten the hood. If you are using thin fleece that does not keep its shape well, you can make a facing using a strip of 1 1/2″ fleece sew to the front and turned to the inside of the hood. This will add a bit of stiffness to the front of the hood.
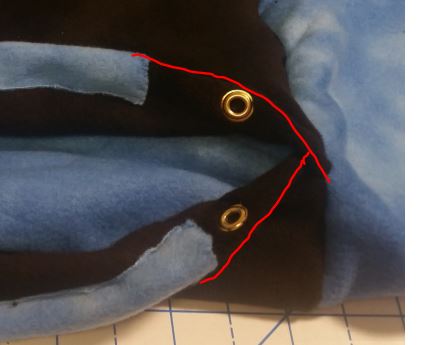
- Add a grommet to either the facing or the turned hem of the hood 2″ front the bottom of the hood. The grommet should be placed so it faces the inside of the hood after hemming. By placing the grommet in this location, when you sew the three pieces together, you won’t block the string access.
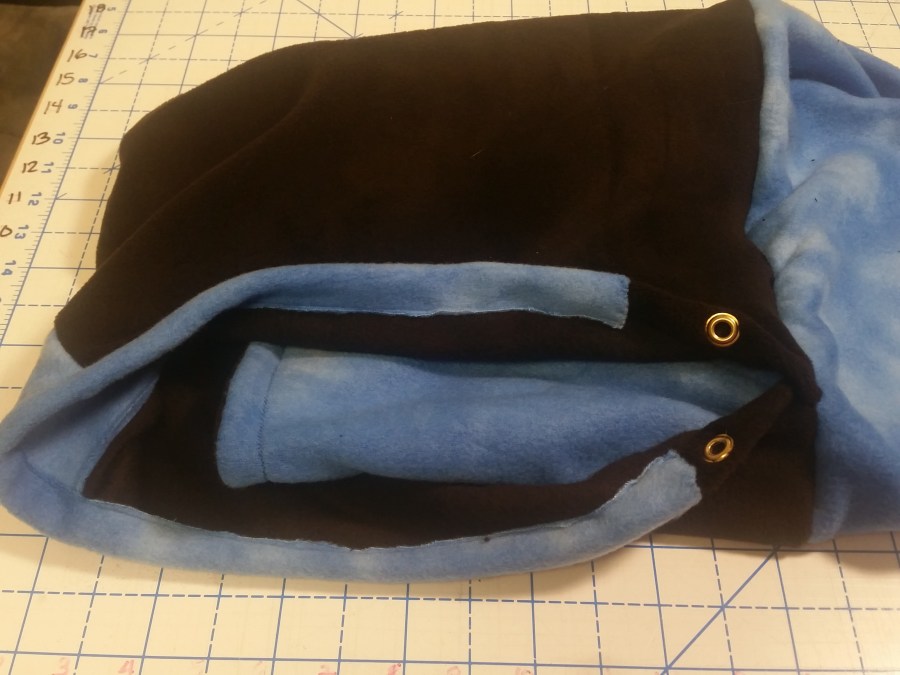
- To assemble the three pieces together, I deviate from Olive Leaf Journal instructions only because I found this more logical for me to keep the fronts and backs clear. Assemble the hood, right-side out, as you would wear it. Then slip the SCARF/FACE COVER into the hood, just like you would wear it. So, the right side of the SCARF/FACE COVER is facing the lining of the hood. Overlap the hood bottom by about 1/2″. This creates the overlap at the bottom of the hood to avoid a gap. Then, place a bunch of pins to keep the layers from slipping and shifting.
- Turn the NECK COVER inside out and slide it over the other two pieces. Align so that the back seams match and the right side of the NECK COVER faces the right side of the hood. Move the pins from holding together the first two pieces to holding together all three pieces.
- I sewed it together with my machine on stitch length 2 and stitch wide 1.5 using my Viking 21, jersey needle and 100% polyester thread (Guterman). I used a small zigzag, not a straight stitch.
- Once fully assembled, flip the NECK COVER down and you are good.
Overlap described in step 4
Final Hood
Here you can see the second hood I made. I added a facing to add some stiffness to the hood (cut on the less stretchy direction in my fleece).
If you find the hood tend to flop over your head, you may like to make this with a three-part hood. You can use the pattern off CYA Tutorials (http://cyatutorials.blogspot.com/2009/12/scoodie.html). Just use the hood from this pattern and adjust the bottom to match the 16″ wide SCARF and NECK COVER.
This picture explains how hood shape is influenced by how you cut it.

Thank you for the additional tips for construction. I’ve made a few using the original assembly instructions from Olive Leaf Journal. These stitched up beautifully. I was curious to know why in Step 4 (above) you say “Overlap the hood bottom by about 1/2″. Is this to layer the seam so that it’s not bulky? Also, how do you ensure that all the layers get stitched in, if they are at different levels? Thanks a mil for posting this tutorial.
LikeLike
I’m glad you found it helpful. Its been a while, but I believe I made the overlap is to avoid bulk in that seam. It allows you to sew down the hem without actually sewing “on” the prior seam. I did not have trouble getting all the layers stitched in. Not all machines are able to sew many layers. My Janome 6500 does not like these layers, but my antique Viking has not issues. If you have a serger, you could also do much of this with a serger.
LikeLike